I like my desktop but some things really drive me mad. I recently switched to an AM5 board (yeah yeah first world problems) which came with an integrated adapter. Which sucks. Badly. Dunno if it’s the driver or interference from the board itself or due to the case shielding the signal. I don’t really care as well. It can however not be deactivated in the UEFI settings.

I’m using a BT adapter plugged in via USB for years now and moved this over to my new system. It works _excellent_ even with multiple devices. I get clear sound without crackling on my headphones, which is what I really care for to stay “in the zone” for work.

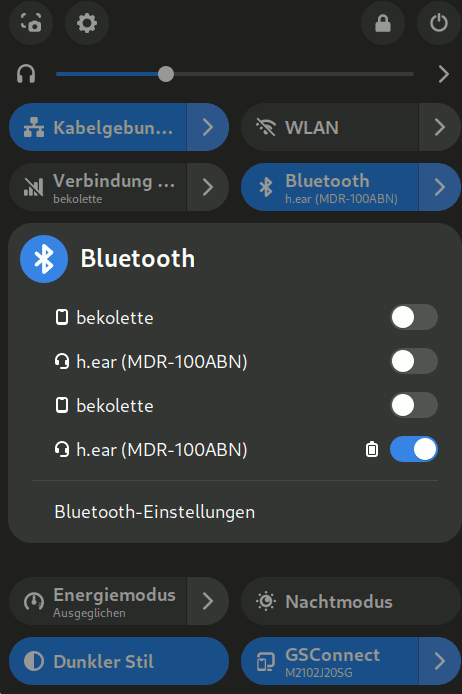
Alas Gnome does not let you choose which BT adapter is used – unlike we know this e.g. from the NetworkManager. Apparently it even defaults to the _first_ adapter it finds, which is by design the integrated one – that I do not want in my case. I can basically only tell them apart by their addresses that I can obtain via the hcitool command:

$ hcitool dev
Devices:
	hci1	10:B1:DF:AA:63:50
	hci0	00:1A:7D:DA:71:06

The full details on this can be extracted from this [closed] 5 years old feature request: https://gitlab.gnome.org/GNOME/gnome-control-center/-/issues/263 (let user choose one bluetooth device from several in gnome control center)

And everything mentioned there is still true and while I usually can understand Bastien’s reasoning in this case I can’t. Alas not all is lost. It’s a little tedious but the following example script was added to unbind an adapter:

#!/bin/sh

ADAPTER_TO_DISABLE=${1:-hci0}
SYSFS_PATH=/sys/class/bluetooth/$ADAPTER_TO_DISABLE

if [ ! -h $SYSFS_PATH ] ; then
	echo "Could not find adapter $ADAPTER_TO_DISABLE"
	echo "Usage: $0 [hciX]"
	exit 1
fi

USB_DEVICE_PATH=`realpath $SYSFS_PATH/device`
USB_DEVICE=`basename $USB_DEVICE_PATH`
echo $USB_DEVICE > $SYSFS_PATH/device/driver/unbind

The adapter will be back on the next reboot so it’s a little tedious but at least I can now kill the malfunctioning one. It’s a hammer to a nail but it works. Put in a script it may be called like this:

sudo unbind-bluetooth-driver.sh hci1

Oddly enough something in the gnome-shell extension acts up now and duplicates the device list.

BT quick selection modal of Gnome duplicating the list of known devices

I can live with that though and it may even be fixed with a more recent version already. I’m still on 44.9 and somewhat behind on this currently.

The Expanse: A Telltale Series by TelltaleTelltale (The Expanse: A Telltale Series – Telltale Games)
Experience the exciting universe of The Expanse like never before in Telltale’s latest adventure, The Expanse: A Telltale Series. Follow Cara Gee, who reprises her role as Camina Drummer, and explore the dangerous and uncharted edges of The Belt aboard the The Artemis. From scavenging wrecked ships in a zero-g environment, to surviving a mutiny, to combating fearsome pirates, you make the difficult choices and reveal Camina Drummer’s resolve in this latest Telltale adventure.
⭐⭐⭐⭐⭐

There are rumours that I “just checked” if this game works at all and finished it 6.5h later in one sitting. I can neither confirm nor deny that. I’m also very sleepy today.

I got this Telltale-game to my birthday and decided to give it a go yesterday. Didn’t expect much and was already kinda annoyed when the starter suggested it requires a gamepad controller (turns out it doesn’t – it can be played with a mouse too). So I got my good old sturdy Steam Controller from next room, jacked it in and… watched it crash. To be fair: I was starting it on Linux, and this game is not made for this. So I checked briefly with the ProtonDB and switched the version from Experimental back to Proton 8.0.

Smooth sailing from here. Game started without a hitch, the controller was recognized, the provided Steam layout worked perfectly fine and it did not crash once until I finished the game hours later. It would also seamless switch to mouse input when this was touched but I decided to keep playing with the controller.

The graphics are nothing to write home about. Sound and music feel immediately like home though, as my wife put it (we’re both fans of the books and show). There are some puzzles but nothing too complicated and – thankfully – sparse. Same for some quick actions that require to hammer a certain button in time (without penalizing hitting a wrong button too). The Zero-G walks are amazing and gave my brain something to chew on when the ceiling suddenly became the new floor.

I won’t talk about the story itself, but I did like that it shows percentages of how other players decided in key situations after each chapter. Kinda interesting to know that there are other outcomes and that also makes me want to play it again. There are plot twists, backstories that may be uncovered, drama, tension, violence, love and death (yes yes, it is a telltale game :D).

Can recommend. Get it and don’t forget to change the air filters 🤓

A person holding a bunch of SSDs like a hand of cards in a poker game.

Once in a while I get a degraded pool. Replacing such a disk and starting the resilver process is usually very easy but there are some caveats when it comes to the of , which is usually the rootfs of the Proxmox system itself. So when a disk dies and gets swapped by a helping hand in the data centre I usually end up with a system that doesn’t boot. Linux really doesn’t like a degraded as rootfs and chances are that it was the new empty disk, that was searched for a bootloader by the BIOS/EFI.

The necessary steps are explained in detail in the “Proxmox VE Administration Guide” under “Changing a failed bootable device” but since I’ll forget this in 10 minutes again I’m writing this up here now so I can find it later via search engines again (this happened!)

So here is the check-list:

  • [ ] Boot a rescue system (out of scope, depends on data centre)
  • [ ] Get ZFS support working (out of scope, depends on data centre / rescue system (yes, a Proxmox Install ISO can be used too!))
  • [ ] Copy partition table from working disk to new disk so we get the same partition layout
  • [ ] Randomize GUIDs for the copied partition layout (having the same partition IDs will confuse the system _a lot_)
  • [ ] Remove degraded disk partition from the rpool
  • [ ] Add new disk _partition_ to the rpool (default is partition 3 for Proxmox)
  • [ ] Reinstall grub / bootloader and/or EFI stuff (default is partition 1+2 for Proxmox)
  • [ ] Don’t bitch to Beko because copying everything here blindly without using the own brain and adjusting to the own situation didn’t work and all data was lost – you break it: you keep the pieces.

sgdisk can be used to replicate the partition table and to get some new IDs:

sgdisk /dev/oldbutgooddisk_n1 -R /dev/shinynewdisk_n1
sgdisk -G /dev/shinynewdisk_n1

Next is replacing the degraded disk in the pool. This can be done in an easy way or the hard way. Chances are that the pool has to be imported first though so changes can be made. This probably needs the “force” Parameter, because the pool was last mounted from another system:

zpool import -f -d /dev/oldbutgooddisk_n1p3
zpool status

This worked with some luck and now the identifiers used by ZFS can be noted from the NAME column. This info is needed to replace the broken|degraded disk partition with the newly created one.

zpool replace -f rpool oldandbrokendisk_n1p3 /dev/shinynewdisk_n1p3
zpool status

This should now show the new disk, where the old and broken disk used to be, and a resilvering process as state. For some reasons this sometimes fails so there is also a hard way. YMMV:

zpool offline rpool oldandbrokendisk_n1p3
zpool detach rpool oldandbrokendisk_n1p3
zpool status -P rpool
zpool attach rpool /dev/oldbutgooddisk_n1p3 /dev/shinynewdisk_n1p3
zpool status

Are we there yet? No. The bootloader has to be installed on shinynewdisk too and the boot partition has to be mirrored as well (it’s outside of rpool). Luckily Proxmox comes with a neat tool for this so this doesn’t have to be done manually alas it is only available on a Proxmox system and not from a generic rescue system. Time to chroot. With ZFS though (pool has to be imported first – see above!):

mkdir /mnt/rpool
# !! Do not forget to change mountpoint back to "/" later!!
zfs set mountpoint=/mnt/rpool rpool/ROOT/pve-1
mount -t proc proc /mnt/rpool/proc
mount -t sysfs sys /mnt/rpool/sys
mount -o bind /dev /mnt/rpool/dev
mount -o bind /run /mnt/rpool/run
chroot /mnt/rpool

The proxmox-boot-tool can now be accessed inside the chrooted environment and the bootloader and boot partition can be written with this again but it’s command is depending on whether it’s status reports GRUB or EFI. The boot|EFI partition is number 2 on a default Proxmox install:

proxmox-boot-tool status
proxmox-boot-tool format /dev/shinynewdisk_n1p2
# With GRUB:
proxmox-boot-tool init /dev/shinynewdisk_n1p2 grub
# Without GRUB:
proxmox-boot-tool init /dev/shinynewdisk_n1p2
exit

It may make sense to check the “Proxmox VE Administration Guide” on this when unsure. The important chapter is “Setting up a new partition for use as synced ESP”. Status will also complain about a missing configured partition ID. That’s from the failed disk that was removed. The offending line may be removed from the suggested configuration file but that warning may as well be ignored. blkid may be used to check on existing IDs.

Are we there yet? NO! The ZFS mountpoint has to be adjusted again, after exiting the chroot environment, or the next boot will fail. For this everything has to be unmounted in reverse order and the pool exported:

zfs set mountpoint=/ rpool/ROOT/pve-1
zpool export -a

Now it’s time for ~~thoughts and prayers~~ a reboot. Good luck future me!

So didn’t show my GPU on when started via . I have an and all the (#ROCr / ) stuff installed. It only listed the iGPU by Intel on startup:

[---] OpenCL: Intel GPU 0: Intel(R) UHD Graphics 630 (driver version 23.35.27191.9, device version OpenCL 3.0 NEO, 25561MB, 2556>
[---] libc:  version 2.37

This works however fine when I run boinc manually as user (or clinfo for the matter), and not via systemctl start boinc-client, so I guessed it’s some permission issue. journalctl had the context I was looking for and threw this in the middle of the boinc-client startup:

audit[305157]: AVC avc:  denied  { read write } for  pid=305157 comm="boinc" name="kfd" dev="devtmpfs" ino=532 scontext=system_u:system_r:boinc_t:s0 tcontext=system_u:object_r:hsa_device_t:s0 tclass=chr_file permissive=0

This is SELinux’s charming way of telling me that it blocked read and write access to /dev/kfd (the main compute interface shared by all GPUs, according to the ROCm manual) for the boinc process. Nice. So what most users do now is grumble and disable SELinux, which is kinda a bad idea. The more advanced user does this and calls it a day:

sudo ausearch -c 'boinc' --raw | audit2allow -M boinc
sudo semodule -i boinc.pp

This basically prepares an override policy based on any rejected boinc activity that looks in my case like this:

module boinc 1.0;

require {
	type hsa_device_t;
	type random_device_t;
	type boinc_t;
	class chr_file { ioctl map open read write };
}

#============= boinc_t ==============
allow boinc_t hsa_device_t:chr_file { ioctl map open read write };
allow boinc_t random_device_t:chr_file write;

Not today though. It left me befuddled with the following output:

libsemanage.semanage_direct_install_info: Overriding boinc module at lower priority 100 with module at priority 400.
Failed to resolve typeattributeset statement at /var/lib/selinux/targeted/tmp/modules/400/boinc/cil:3
Failed to resolve AST
semodule:  Failed!

…and I have no idea why. I also found nothing on Google Search. So to not be DenverCoder9 (https://xkcd.com/979/) in the future here is what I found out so far:

sudo cat /var/lib/selinux/targeted/tmp/modules/400/boinc/cil | bunzip2 
(typeattributeset cil_gen_require hsa_device_t)
(typeattributeset cil_gen_require random_device_t)
(typeattributeset cil_gen_require boinc_t)
(allow boinc_t hsa_device_t (chr_file (ioctl map open read write)))
(allow boinc_t random_device_t (chr_file (write)))

Apparently it can’t resolve the required typeattributeset boinc_t – which is kinda odd as it exists (see sudo semodule -X 100 --cil -E boinc and the resulting cil file). Frankly this is where SELinux lost me too. I found the man page for boinc_selinux, which is not really known on my Fedora system here, so I may be missing something. It suggests to enable permissive mode for boinc_t (instead of dropping SELinux altogether):

Note: semanage permissive -a boinc_t

can be used to make the process type boinc_t permissive. Permissive process types are not denied access by SELinux. AVC messages will still be generated.

https://linux.die.net/man/8/boinc_selinux

And sure enough on the next restart my AMD GPU became available:

[---] OpenCL: AMD/ATI GPU 0: AMD Radeon RX 6700 XT (driver version 3558.0 (HSA1.1,LC), device version OpenCL 2.0, 12272MB, 12272>
[---] OpenCL: Intel GPU 0: Intel(R) UHD Graphics 630 (driver version 23.35.27191.9, device version OpenCL 3.0 NEO, 25561MB, 2556>
[---] libc:  version 2.37

Happy numbers crunching. Mebbe some fix for SELinux crosses my path in the future so I can update this with the proper solution.

Yes, does only support one gamepad. Single digit. This gamer doesn’t care. Here have and in . Vanilla. No mods. Thanks , and ❤️

Mebbe I’ll do a proper recording someday:

No Man’s Sky with headtracking and HOTAS (on Linux PC)

Wondering about that button box? Didn’t use it in this demo but you can find plenty more examples on the channel and more details on my blog: https://beko.famkos.net/category/simpit/

How it’s done? NMS does support a gamepad but it also reads/maps all gamepads to a single device. It makes no difference between multiple gamepads!

This leaves me with a very limited amount of possible buttons on the HOTAS after mapping that to one virtual gamepad using MoltenGamepad (I usually split that one up into multiple gamepads for braindead games).

So for additional buttons I used AntiMicroX to map the rest as keyboard presses.

Doing so I noticed that NMS does “look-around” on the right stick and this is where OpenTrack comes into the play. It offers a joystick output (using evdev) and that is also just… a gamepad! Needs some remapping though to get pitch and jaw to the proper axis for NMS. This is done via SDL env (basically what Steam does under the hood but boy their GUI for that sucks): SDL_GAMECONTROLLERCONFIG="000022e86f70656e747261636b206800,opentrack-to-nms,rightx:a3,righty:a4,platform:Linux,crc:e822,"

And there you have it. NMS with my trusty old X52 Pro and a DIY headtracker for 5 bucks 🤓

PS: I’m aware that the recording quality sucks. This was very spontaneous with a webcam sitting on my chair. I basically just finished my happy dance that this started working properly and decided to smash that recording button. PC was not even in “gamemode”.

Originally I was going to replace a disk on my hardware controlled RAID 5. That didn’t work out well. The controller supports hot-plugging but the LED indicator stayed on faulty. To debug this I had to boot into the controller to check for the error message and lo and behold it appears my spare has an invalid block size and the controller is too dumb to format it with another, unlike e.g. sg_format.

And this should have been the end of the story until I can reformat this on another SAS capable PC. Alas grub rescue greeted me on reboot with “error: disk `lvmid/foo/bar` not found.

and I could not persuade it to boot the LVM member. The thing is that this disk is NOT under control of the hardware RAID controller. It’s plain SATA and it’s boot order is before the RAID controller so I really did not expect any trouble here.

Turns out I was running into this rare bug https://bugs.debian.org/cgi-bin/bugreport.cgi?bug=987008 where the words “time-bomb” and “critical” are dropped. The gist is that grub has a bug that prevents it from reading LVM meta data sometimes and this results in a broken bootloader.

This is not fixed with the usual reinstall dance from another boot-able medium. The trick is to manipulate the LVM meta data in some way, e.g. by adding another volume temporary.

This means running a vgscan after booting from another medium and *in my case executing* e.g. lvcreate -L 4M pve -n foo

The name doesn’t matter as it can be removed afterwards. Updating the initramfs should run without errors now and is a good indicator if this worked. Now it’s possible to reboot again.

The two problems have basically nothing to do with each other. It was just my lucky day to run into this sequence of chained issues during my free Saturday night 😩

Oh yeah, meanwhile the RAID recovered also. Another spare was added until I have time to take a closer look at the block size issue.

Did some space pew pew like it’s 1999. This is X: Beyond The Frontier. One of the very first space games using a “so called” 3D card. Haha, those crazy peeps at Egosoft updated it in 2021 to make it compatible with Win11 which means it’s basically running on Linux PC out of the box as well. Mapped my joystick and dived into it once more. Doubt I’ll play it much but that was a nice excursion down memory lane

I still have the original CD-Rom but when I noticed that it’s on a Steam sale for -,99ct I didn’t even bother to look for a CD reader. What a surprise that this runs at all.

I also have some short video footage. I’ll never forget that glorious intro. “Here is how the ship navigates… and action. Bam. Here are 1000Cr, the most basic shield and no weapons. Go! Trade! ‘Maps’? ‘Earth’? What’s that? Oh and you have to pay those Cr back. With interest.”

X: Beyond The Frontier (on Linux PC)

I hacked a mod for X4: Foundations to get ship telemetry and targeting data to my “Primary Buffer Panel” via a socket. This is a demonstration of my simulated cockpit made from cardboard on a budget usually used to play Elite Dangerous now also used for X4: Foundations. This is work in progress.

My DIY cockpit for X4: Foundations (on Linux PC)

In use:

  • A Linux PC
  • A DIY Headtracker
  • A DIY Joystick (My Primary Buffer Panel)
  • A X52 Pro HOTAS
  • An AMD RX6700XT
  • …a lot of plumbing in Node-Red xD

This is loosely based on the Python Pipe Server mod for X4 that is sadly Windows only using Named Pipes. I fixed that for Linux PC by side-loading the library LuaSocket and starting a socket server directly in X4. That’s right, the Python Server is simply not needed now and companion tools may directly connect to the socket. It’s a nice bonus that LuaSocket also allows a UDP or TCP server depending on how it is started. That was some piece of work though and I’m still wrapping things up to publish my code changes. I’m also still looking for testers so if you’re interested get in touch!

So you _still_ think you can’t space pew pew on Linux PC? Think again. I do it all the time: https://beko.famkos.net/2021/10/16/space-pew-pew-on-linux-pc/

Here are the humble beginnings[1] of a working example to read the ship status of in a format very similar to the Status File of

Both games are quite similar and by using a “well established” format it should be possible to use this with existing companion apps – like my own

It uses the “Named Pipe API” of “sn_mod_support_apis” – on PC 😁 This was not supported by this MOD so far but I made it work.

Well, at least on my machine 🤓

And yes, the pipe server works with some minor adjustments for other _existing_ apps as well. Here is a demo of with a data feed directly from X4: Foundations – it does not use the though, since that is not really needed, so I had to make some small adjustments in it’s connection routine but that was like 2 lines of code 🤷

[1] TBF the humble beginnings were back in 2021 (https://beko.famkos.net/2021/05/01/getting-into-x4-foundations-modding-on-linux/) but I kinda let it slide to tinker and build my Primary Buffer Panel (https://beko.famkos.net/category/simpit/) first. Other games made it easier to retrieve game data and I did learn a lot during that time but it was X4 that started it all.

Another night in the X4 sandbox: https://www.youtube.com/watch?v=665hXLKSfek / https://tube.tchncs.de/w/pHFP8jZf7PYLyLZSARZQ4T

This is heavily distilled early gameplay of X4: Foundations, where I started another play-through slowly expanding my little empire with trade, side missions, station building, border patrol (loosing the the “Misfit”, my good old starter-ship), a surprise Xenon attack on a station where I was just for shopping and eventually good old fashioned piracy with unexpected guest appearance of some Kha’ak trying to crash the party.

01:11 Setting up trade routes aboard The Law Abiding Windrunner
02:20 Switching over to the Misfit
03:05 Witnessing the death of a trading station (while escorting my own ships to safety)
03:50 Patrolling for money (and looting stuff)
05:48 Repairing satellites (in EVA suit)
07:32 Docking at the impressive Teladi ring station for shopping
08:45 Surprise attack on the ring station by a Xenon K (and it’s demise)
14:32 Extending my own station and buying more mining ships
11:26 Switching over to my frigate for border patrol (lots of pew pew)
14:30 Loosing the Misfit to Kha’ak (and avenging it)
16:07 Going for resupplies and preparing for piracy
16:39 Ambushing the prey, a fat water freighter looking for a new owner
17:59 Starting the boarding operation
18:40 Realizing I need more support to deal with surprises
18:58 Stumbling over mentioned surprises, Kha’ak trying to crash the party
19:51 Sending more boarders as the first group fails
20:22 Finally going home with the price, a “slightly banged up” L water freighter